Whilst many climber now days are happy climbing predominantly indoors, the desire to climb outside on ‘real’ rock is a something that should never be over looked. Making the transition can be a bit of a rocky road, however done properly will open up a whole new world of experiences, challenges and friendships.
Climbing outside is so much more exhilerating than being coped up in the industrial under world of an indoor climbing wall. The number of routes are endless, the challenge of mastering different rock types unending and the excitement of new skills can all be truly invigourating.
This article is going to cover the added risks of climbing outside, the new equipment you will need to master as well as the some ways to make the transition to moving over really rock rather than artificial structures. Whilst it won’t answer all the questions and points that you need to be aware of climbing outside, the next article will combine the skills addressed here with the rope work needed minimise those risks further.
Outdoor Risks and Control
Indoors climbing can be very sanitised, the risk kept as low as possible through on going risk assessments, safety checks and the vigilant eyes of climbing wall staff. As such the greatest risk is that of human error, in either tying in or belaying. Outside the level of risk starts to rise.
Firstly, rock can on some occasionally be loose and small rocks can gather on ledges or at the tops of crags, which can be knock off by passing climbers, the wind or passing sheep, meaning that it is reasonable measure to always wear a helmet when in the vicinity of the base of the crag, especially busy crags, as the more climbers above you the greater the chance of something being dislodged, even a carabiner dropped from height will hurt.
The base of the cliff, and sometimes the approach will be on rough and uneven ground, meaning there is a greater chance of slips, trips and falls. If boulders are strewn about below the cliff this might mean a 6 foot drop or more if you were to slip, which might not be life threatening but will have the potential for a nasty injury. So be careful when moving around, by simply being aware of any potential drops is usually enough reduce the risk to an acceptable level.
When at the top of the crag, it is possible to walk about right up to the edge, where indoors you were always on a rope when at height, when you start rigging your own belays you will possibly be unroped above a substantial drop. A simple slip or trip could have fatal consequences, especially if it is damp under foot or windy. The trick is to try and safeguard yourself at all time. We will cover this more fully in the next article on rigging top ropes, at its most basic it is simply being in a stable position near an edge, be it sat down or having one hand on a hold so that it impossible for a slip to become a fall.
The biggest difference of all is that outside in the UK there are usually no bolts or fixed gear to attach yourself to, so you will have to master how to place and assess the placements of naturally place gear like nuts, cams, spikes and threads. We will cover this later in this article.
Lastly, most beginners crags are very slabby in nature, meaning that any significant fall will often result in a climber hitting a ledge or slab. Where indoors the walls are steep enough so that it is often hard to impact with anything during a fall. To prevent this you need to be vigilant whenever belaying, keeping the rope not only snug but also checking that it has not snagged in any cracks, preventing the rope from being taken in.
Equipment
This a brief list of what extra gear you will need to get to move from indoors to out as well as how to use them. As well as the more specialist gear you also need to start thinking about environmental considerations. Things like the amount of clothing you take to the crag. It might be sunny at your house, but it can be a different story at the crag. Anticipating this will make for a much more pleasant experience.
Also there are no toilets at the crag so consider where you pee, not below classic boulder problem like Brad Pitt?! Also it is best to avoid the issue of having a dump at the crag by addressing the situation before you leave. Being caught short think about your actions? Remember the maxim, ‘Take only picture, leave only foot prints’ is a great motto when outside anywhere.
Helmet
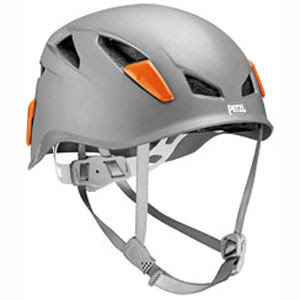
This is almost essential when climbing outside, rock fall or dropped gear could potentially lead to some serious injuries if you weren’t wearing a helmet. Years ago they were quite large and heavy affairs, and many people considered them cumbersome. The modern climbing helmet is considerably lighter. Although it can be argued the lighter the helmet the less protection they offer, the simplest way to look at it is any helmet is better than none.
Whilst style might not seem important for such an integral piece of safety equipment, the fact is that you will be more disinclined to wear it if you don’t think it looks good on.
I would argue that the more comfortable and stylish you find a helmet the more you will wear it all the time when at the crag. As such there are numerous helmets on the market from the more heavy duty Petzl Roc Encrin and HB Carbon Fibre, to the comprimise of the Petzl Elios and the ultra light Petzl Meteor III.
There are other brands and styles on the market, all are rated to a UIAA and EN standard, so whatever you choose to purchase they will all help keep your head in one piece.
Protection
Nuts
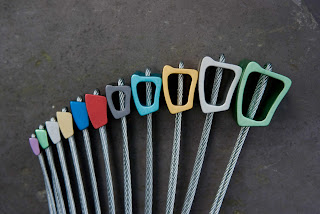
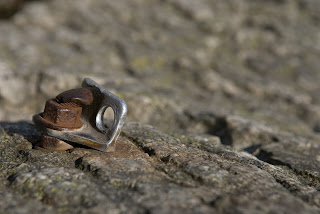
Wires are the most basic piece of climbing protection, a metal wedge attached to a wire. These come in various shapes and sizes, although the best for UK rock, because many popular placements have become shapped to the most popular brands are DMM Wallnuts, Wild Country Rocks and Clog Nuts.
With all placements you need to assess the rock around the placement, taping it with a carabiner and listen to see if it sounds hollow could well reveal hidden weakness in the rock. If it is hollow or the rock moves when a wire is placed and seated, then the placement is compromised, and should be avoided.
Having established the rock is solid, you then need to choose the right size of wire to best fit the placement. You need to check that when the wire is placed in a natural constriction in the rock that there is lots of metal in contact with the rock, the wire has a degree of over lap compared to the size of the placement and that the wire is well seated and that the wire is placed to take a load in the right direction.. What are all these terms?
In short: Solid Rock, Good Contact Area, Overlap, Seated well and Directional
If you see the diagrams of placing a nut. A) Checking rock for solidaty. B) The right sized nut with good contact area and overlap. C) Seating the wire by using the other wires as a hand hold to apply a shock load, whilst checking the rock doesn’t move. D) Wiggling the wire gently to see if it unseats itself.
Hexes
Hexes are similar to wires, in terms of the considerations when placing them. Although they can be placed as a passive large nut, they work best by placing them so they naturally cam into the placement. (See Diagram)
Spikes
Spikes are the simplest of placements, you need to consider the Three S’s; size, shape and solidity. The size of a free standing boulder really needs to be at least twice the size of an adult on there hands and knees, and on a solid based so it won’t roll or rock about. The shape of it needs to be so that when a sling or for that a matter a rope is looped over it in won’t ride up and over the top. To check the block is solid give it a good kick and feel for any vibration and then try and move it with your body weight, be careful not to send you or the boulder carriering over the top of the cliff.
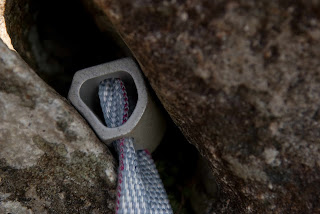
Threads
Occassional we get natural holes in rock that we can thread with a sling or rope. These are great placements as they are omni-directional. If you are threading the link between two boulders consider, that both blocks have to be solid, and neither can move.
Cams
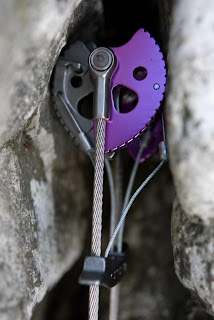
These are the hardest placements to make, as the mechanical nature of cams often confuses people. More importantly than any other piece of gear the rock need to be really solid, even solid looking flakes should be avoided if possible. This is due to the mechanics of how cams work, so for every kilo the cam is loaded by it forces the cams outwards at three times that force. So 100kg load would lead to a flake being forced apart by 300kg. This is not that an unlikely force in a tope rope system.
All the cams need to be in contact with the rock and the cams need to be somewhere between 25% and 75% of there maximum and minimum range. Outside that the placement can be weaker.
Trees
Whilst as climbers we are usually not up on our abrology (tree science) we should be able to assess a tree health. Look up and see if there is a healthy canopy, are there any leaves or fresh buds. What does the route systems look like? If the tree looks health then consider the diameter of the trunk. The size of a thigh is a reasonable guide to using it as an anchor.
Bolts, pegs and various ironmongery
In-situ iron is very hard to judge, as most of the corrosion happens out of site below the surface. Despite looking OK, they may be perilously close to failure. Certainly whilst replacing pegs and bolts in the slate quarries I have come across both bolts and pegs that were severely corrode, so much so I have been able to remove some pegs by hand, as sheered of bolts as I was unscrewing them.
Stakes at the top of crags are another concern, just how long have they been there? How far in to they go? Not to mention what are they placed in (if a flake, is the flake solid?).
It is often wise to back up any in-situ metal work, especially in maritime environments. Something which is worth considering when you eventually start lead climbing, whilst it may be quick to clip a peg, I will always try and find some natural gear if possible.
Courses
There are many courses on offer from a variety of sources on moving outside for the first time. The level of qualification you are looking for is either SPA, MIC/MIC or of course a Mountain Guide. These course are often referred to as moving outside, transistion, getting started, intro or ‘Real Rock’ course. They can last anything from two days to a week. You should look for a maximum ratio of 1 to 4 if you expect nto get the right amount of input from an instructor.
They should cover fully the skills that this and the following article cover, and you should never underestimate the input you can gain from a good instructor, even if it is just reassuring you that you are doing things right, and being given a few top tips and handy hints to make the process easier.
For a course with the author click here.


